Create a Consigner Profile:
- Begin at Main Home Page (Jubilee Kid’s Consignment – Jubilee Kids Consignment)
- Click on the Yellow “Registration Button”
- This will take you to the Consigner form that needs to be filled out.
- After you have completed the form, Click on Submit.
- This will give you a confirmation message that will give you your Consigner number as well as a message saying that an email has been sent to you
- Click “Continue”
- Enter your Consigner number and your password.
- You are now on your Homepage.
Enter Items into the Consignment:
- Begin at your Consigner Homepage.
- Click the Drop-Down Menu.
- Click on the “Work with Consigned Inventory” Option.
- Click “Add Items”
- Select which version you need to use
- Mobile Version (On your Mobile Device)
- PC/Laptop Version (On your Computer)
- Enter the necessary information
- Be sure to check the boxes next to Donate or Discount if you are wanting to do either of those options.
- Click Submit Item
- This will take you to the page that displays your Active inventory.
- You can add all of your items following the previous three steps.
- Verify that all information is correct.
- Clicking the Donate box will populate a box truck icon in the “Inventory Status Icon” box.
- Clicking the Discount box will populate a tag with a percent sign in the “Inventory Status Icon” box.
Print Tags
- Starting at your Consigner Homepage.
- Click the Drop-Down Menu
- Click on the “Work with Consigned Inventory” Option.
- Click “Print Tags”.
- Click “Print Selected Tags”
- Click “Tag Printing Options”
- Print Selected Tags – Prints the tags that you have checked the box for the item
- Print all tags – Prints all of the tags
- Print all un-printed tags – Prints any tags that have not been printed yet
- Print only discount tags – Only prints the tags for items you have selected to be available for discount.
- Print only donate tags – Only prints the tags for items you have selected to be available for donation.
- You will get a pop up wanting you to verify that you want to print tags. If this is what you want to do, click ok.
- If you are not ready to print, click cancel.
- If you do not see a page with your tags on it, make sure that you do not have the pop up blocked.
- Be sure you are using WHITE cardstock.
- You are now ready to print your tags.
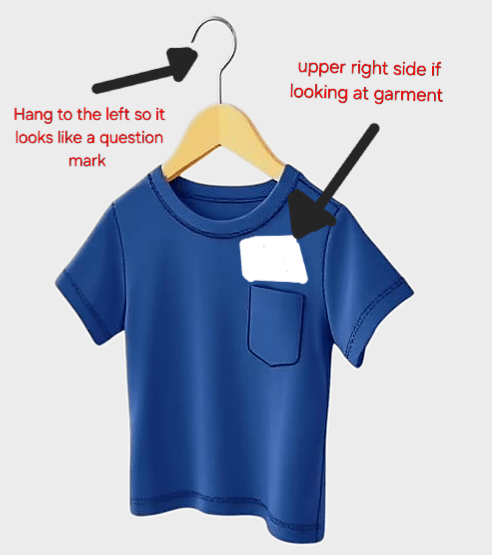
Hanger Orientation and Tag Placement
- MUST use White Cardstock paper
- Hanger MUST make a “Question Mark” and the tags must be placed on the upper right side of the item.
- All directions are in relation to you looking at the item